Key Findings
- Capable of precisely roasting 50-200 grams of coffee
- Invaluable tool for roasting green coffee samples, roasting for competitions, or profile development for commercial fluid bed roaster
- PID software automation of heat and loft
- Free access to their robust proprietary roast logging software
- Abundant online resources to assist users
- Ability to collaborate with other Kaffelogic or Nucleaus Link owners
- Service centers in the US and throughout the world
Terms
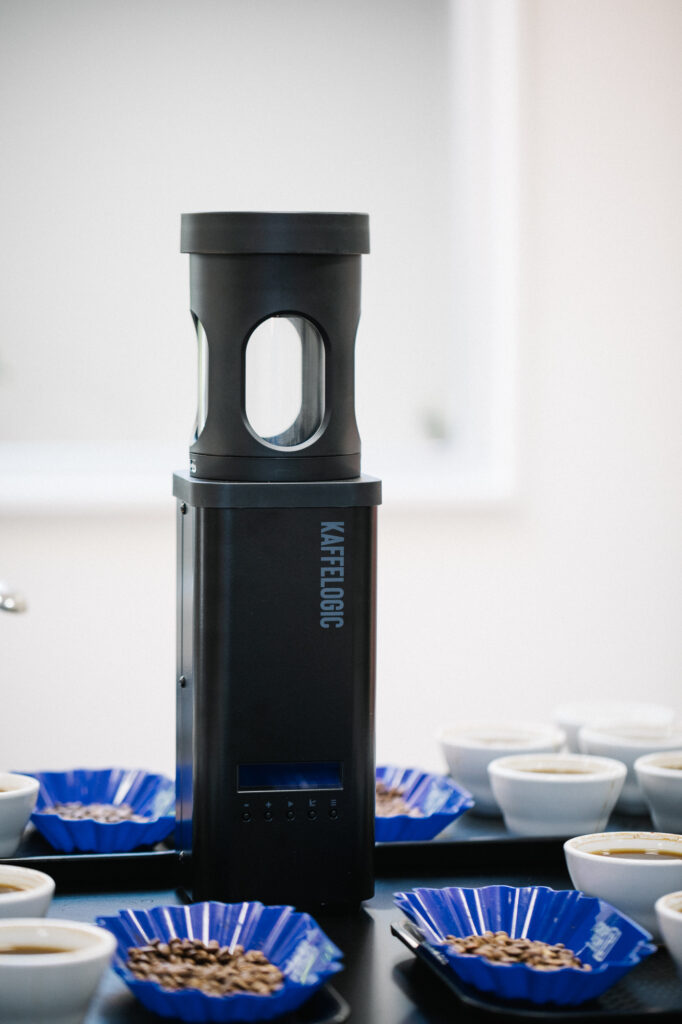
The folks at Showroom Coffee in Brooklyn, New York sent me a refurbished Kaffelogic Nano 7 (hereon just referred to as the Kaffelogic) for testing and evaluation with the agreement that I would write a review about my experience with the roaster. After the agreed upon evaluation period, I was given the option to purchase the roaster or return it, and I was provided with an affiliate link for the roaster should I decide to recommend it. The following image is from their website.
My Background and Bias
A person’s training, experience, expectations, values, intended use, and budget, all influence and bias the way we view the world and evaluate products such as the Kaffelogic.
I am someone who values function over form.
I am someone drawn to high quality products with high perceived value for money spent.
I am someone who enjoys roast profile experimentation and flavor exploration with various coffees.
I am someone who enjoys participating in roasting competitions.
I am someone who has embraced PID technology and roasting automation in the world of fluid bed roasting.
I am someone who turned a seven-year hobby of roasting coffee into a side hustle in 2021.
I am someone for whom the allure of the Kaffelogic is its ability to roast as little as 50 grams for green coffee buying decisions and for the possibility of profile development for my larger fluid bed roasters, which are the Coffee Crafters 3E (1 kg) and the Roasted Right (6 kg).
Overview
Coming in at a price tag of $1290.00, the Kaffelogic is a small, semi-automated, table top, UL certified, electric, hot air/fluid bed roaster that can roast as little as 50 grams and as much as 200 grams with the purchase of a $200 boost kit. There are two models of the Kaffelogic depending on the electrical requirements for where you live: KN1007B/E (200-240 volts) and KN1007B/J (100-120 volts). The roaster comes with a two year warranty.
The Kaffelogic is very compact coming in at approximately 5 inches squared in terms of width and depth, 17.5 inches tall, and 9.6 pounds. The external case is powder coated steel. The roast chamber consists of two sections. The lower portion is aluminum and is built into the base unit. The upper portion of the roast chamber is glass and is protected by a hardened enclosure that appears to be made of the same high temperature resin that the chaff collection tray is made of. The fan motor is a brushless DC motor. There is one “naked” thermocouple in the roast chamber.
The Kaffelogic is manufactured in New Zealand. Showroom Coffee is the US distributor and service center, but the Kaffelogic is also sold in the following other locations: Australia, Canada, China, Europe, Hong Kong, Hungary, India, Indonesia, Iran, Malaysia, New Zealand, Singapore, South Korea, Taiwan, Thailand, Turkey, Ukraine, and the United Arab Emirates.
Kaffelogic Resources
One of the great things about the Kaffelogic roaster is that there are abundant online resources to assist owners and many of them can be found on the Kaffelogic website. Examples include, the Kaffelogic Quick Start Guide, the Kaffelogic Profile Guide, the Kaffelogic Wiki, Kaffelogic Community Forum, and the Kaffelogic Facebook User Group. Then there are the folks at Showroom Coffee who are the US distributor and service technicians for Kaffelogic.
For some, this abundance of information might seem overwhelming. For any question you have, my recommendation is to start with the materials produced by the creators of Kaffelogic as they are the experts of their own roaster. The great thing though is that there is a robust online community of Kaffelogic users and representatives from Kaffelogic are actively engaged with Kaffelogic users in these forums.
Basic Features
Having roasted hundreds of roasts on a Fresh Roast SR540 in my days as a home roaster, I can’t help but see a number of similarities between the basic design of the Kaffelogic and the SR540 and even more so the discontinued SR700. Both have a detachable roasting chamber that sits on the roaster base that requires the user to manually add green coffee and manually dump roasted coffee out of the roast chamber. Both have similar chaff collection lids that must be emptied between roasts. Both are capable of roasting around the same quantity of coffee. The SR700 allowed the user to create rudimentary profiles on a laptop using the OpenRoast software, connect the SR700 to the laptop, and the SR700 would roast the coffee according to the profile.
While the Kaffelogic in theory can be used to manually roast in “timer mode,” I must admit that I have not experimented with this and likely never will. The allure of the Kaffelogic is its ability to make small batch roasting more automated and hands off. The Kaffelogic functionally is more akin to roasting with an earlier pioneer in this space, the Sonofresco fluid bed roaster. With Sonofresco fluid bed roasters, the user selects a Sonofresco supplied roast profile or designs a roast profile with their ADR software and the Sonofresco roasts the coffee according to the profile. The user cannot manually make any changes to the heat or airflow during the roast other than to end the roast earlier than the drop point specified in the profile. Practically, this is how I use the Kaffelogic but they have now integrated the ability to use the buttons on the face of the roaster to increase or decrease the fan and to increase or decrease the drop temperature. Like the Sonofresco, the user can end the roast manually at any point.
The Kaffelogic can be used with or without a laptop being attached via a USB port and a supplied USB cable. I must admit I am concerned about the longevity of the USB port and how long it can withstand the USB cable being inserted and removed. The roaster comes installed with twelve roasting profiles, which the user can toggle though on the small display screen on the front of the roaster using a row of buttons. Once you select the profile and the weight of the coffee being roasted, you press the play button and the roast begins. Like most fluid bed roasters, no preheating of the roaster is required. As the coffee is being roasted, the display screen shows the time and temperature. When the roaster reaches the end point designated by the selected profile, the roaster automatically turns off the heating elements and begins the cooling cycle, which lasts around three minutes and forty-five seconds. Once the cooling cycle is complete, the fan will stop and the roast chamber can be removed and the coffee dumped out.
Here the Kaffelogic is very similar to Sonofresco and Fresh Roasts. Many Fresh Roast users who have adopted the method of removing the roast chamber post roast and dumping the coffee into an external cooling tray are probably wondering if the same can be done with a Kaffelogic. While I think the answer is it can, I wouldn’t recommend it for two reasons. First, unlike the Fresh Roast, the Kaffelogic does not appear to allow the user to manually turn off the cooling cycle to allow you to dump the roasted coffee. It appears to have to run a full cooling cycle before the fan stops. Depending on the volume of coffee roasted, the odds of making a huge mess transferring coffee with the fan on is high. Second, the risk of damaging the Kaffelogic in the process is high.
Kaffelogic Studio Software
For those looking to get the most out of the Kaffelogic, you will want to download the proprietary Kaffelogic Studio software onto a laptop. The Kaffelogic is not compatible with other roast logging software. As someone with years of experience with Artisan Scope roast logging software, I can say that the Kaffelogic Studio software is very robust and allows the user to select how little or how much access to the profile settings you want. In the “options” tab, you can select one of four options: basic, advanced, expert, or engineer. For those who want maximum control and tinkering ability, the engineer setting allows a staggering amount of control.
The other main feature of the software is the ability to create new roasting profiles or edit an existing one. Here is where the Kaffelogic Studio software departs from other roast logging software such as Artisan Scope in that you not only create a traditional bean temperature roast profile you also create a fan profile to control the airflow during the roast. The software uses a PID controller to automatically regulate the heat and the airflow to attempt to follow the specified roast profile.
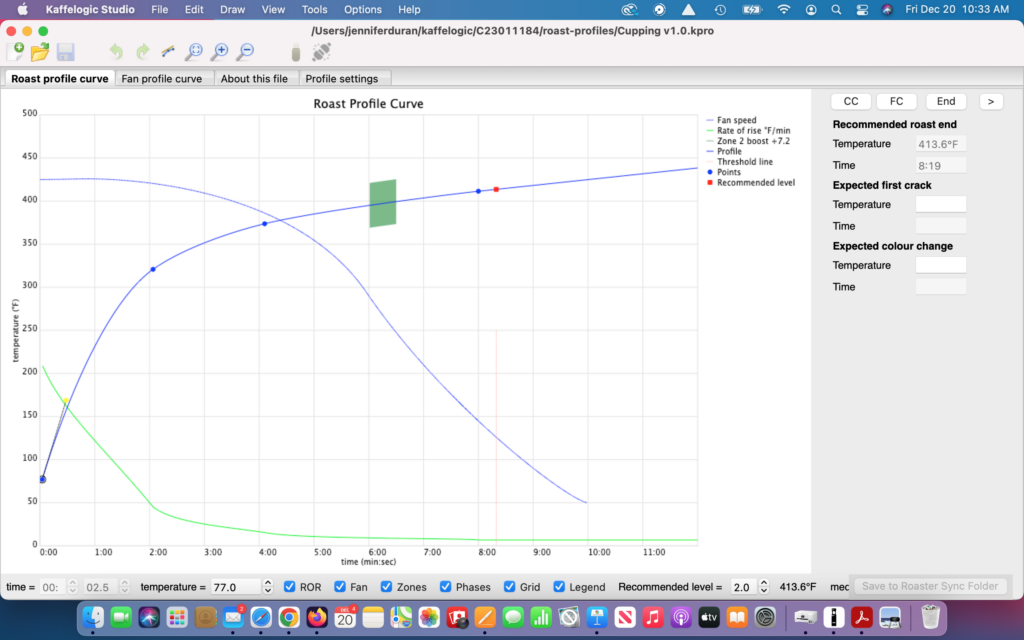
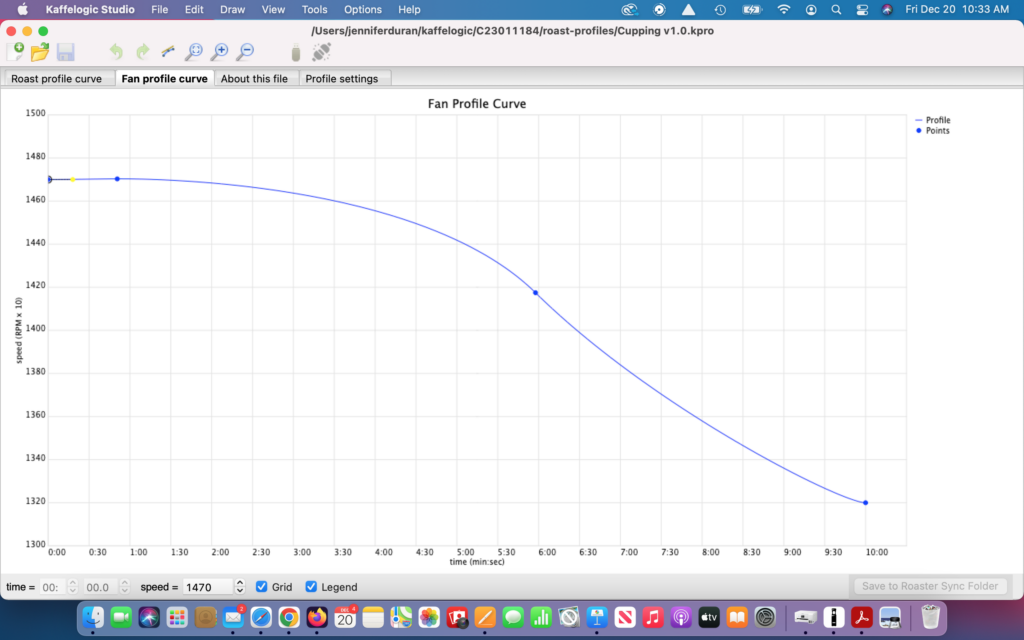
Let’s say you have the profile you want to use for a specific coffee. The software has a button you press to send that profile to the roaster. You can view the display screen on the roaster to verify it has loaded the desired profile. The software also has a button to press to sync the roaster to the software so that you can view the roast live. This does not always work. When it doesn’t, the roaster will roast the coffee according to the profile and then display the roast profile afterwards. While you might see that the Kaffelogic followed the roast flawlessly, what you are more likely to see is some slight profile deviations at various points such as the start of the roast, around first crack, and between first crack and the end of the roast. If you are roasting a more developed roast, it is common for coffees to want to go exothermic and the rate of rise to overshoot the roast profile.
For those not familiar with using a PID to roast coffee, think of it like the cruise control in your vehicle. You set the target speed (set value) at 55 miles per hour and the vehicle’s computer tries to maintain the target speed but in doing so it often goes a little slower (undershoots) and goes little faster (overshoots). The computer in your vehicle is taking in a tremendous amount of data at mind boggling speeds and using PID values to quickly make advanced mathematical calculations about how little or how much “fuel” (gas/diesel/electric) is needed to reach the set value in a controlled manner and maintain the set value without exceeding it. Something similar is going on with the PID controller inside the Kaffelogic except the set value (the target bean temperature) is incrementally increasing as one progresses further on the roast profile, which makes tuning a PID for a coffee roaster exponentially more complicated than other common PID uses in the world.
In Artisan Scope PID, the way to correct for profile deviations is to tune the PID settings. While users can make changes to the PID settings in the Kaffelogic Studio Software under the engineering setting, Kaffelogic clearly does not want users making changes to the PID settings and has repeated warnings not to do so in the profile settings. Instead, they have offered a unique solution in the profile settings they refer to as boost zones and corner settings. Boost zones are sections of the roast profile where you can designate specific times of the roast profile where you want the software to add or take away heat in a prescribed way to avoid the roast from undershooting or overshooting the roast profile. Corners are sections of the profile where there is a significant change in the rate of rise such as around first crack where roasts are prone to overshoot the roast profile. The corner settings allow the user to designate specific times of the roast profile where the corner starts and stops. The software then makes adjustments to the heat so that the roast undershoots the roast profile in a controlled manner and essentially cuts the corner off the profile to prevent the roast from overshooting the roast profile.
Compared to Artisan Scope, the Kaffelogic Studio software is not as user friendly when it comes to the profile designer tool and at first can be downright maddening to use. For example, one of the features in the Artisan Scope profile designer tool that makes designing profiles extremely efficient is the ability to right click on the mouse, select config, which opens the designer configuration menu where you can enter the times and temps for the events you want to be plotted on the roast profile. With some trial and error and adjustment of the temps, you can quickly shape your desired profile in Artisan Scope. With both roasting softwares, using fewer data points makes shaping the roast profile much easier. I find with the Kaffelogic Studio software that it is much easier to start with an exiting profile and modify it rather than create a new one.
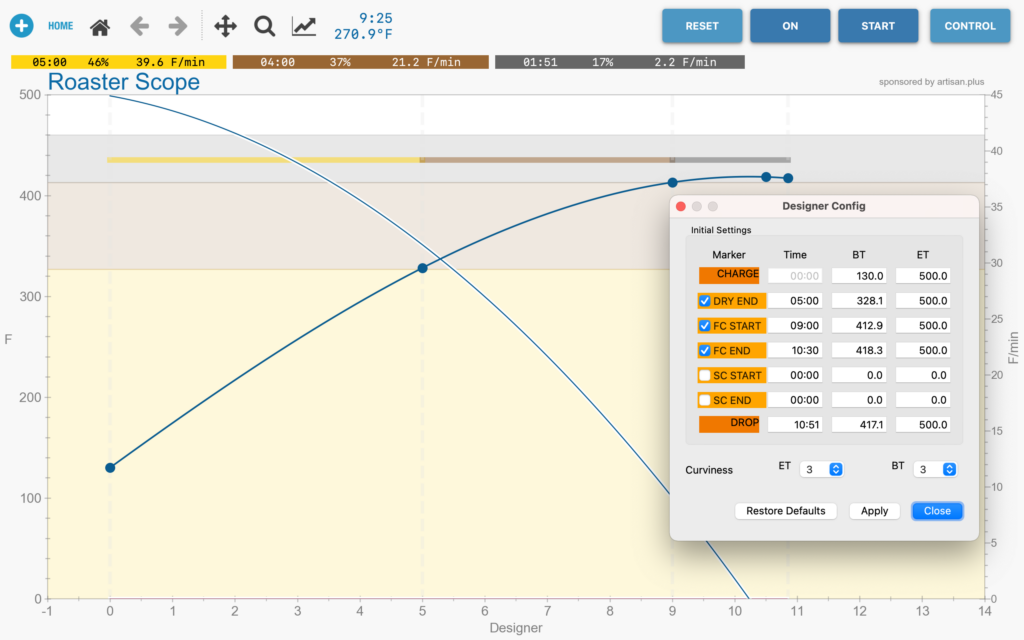
I found the easiest way to design profiles in Kaffelogic Studio was start with one of the supplied starting profiles. I personally did not concern myself with the dry end temperature and focused on first crack, end temperature, and end time. I found the easiest way to get first crack where I wanted it on the roast profile was to select a point on the profile before or after first crack and then adjust the time and/or temperature values on the bottom left of the Kaffelogic Studio software. Once I got the basic profile created, I then used the yellow data points to fine tune the shape of the roast profile and ROR curve.
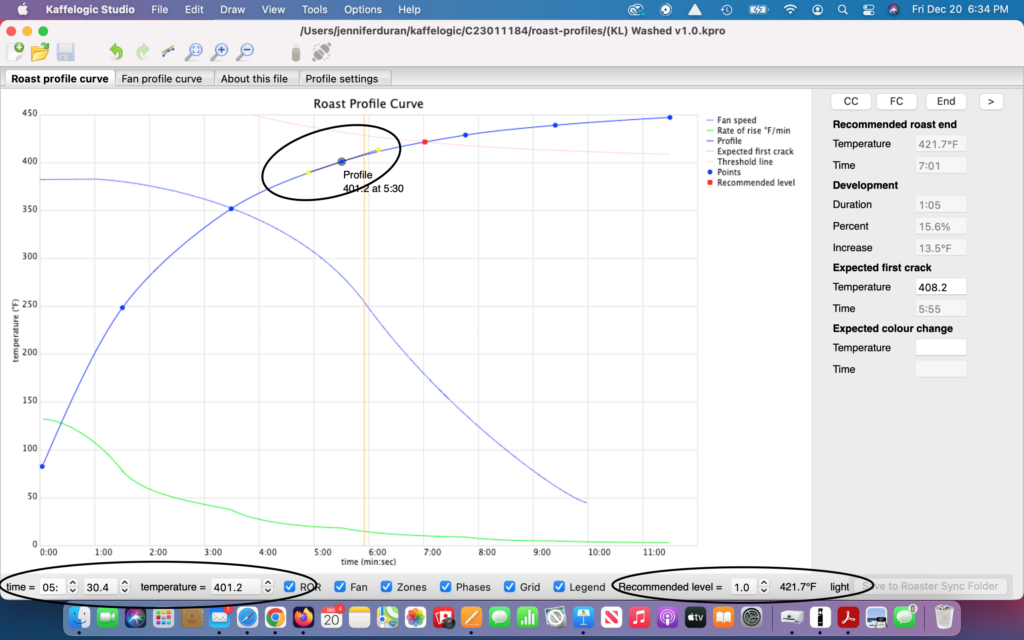
One thing to be aware of, which caught me off guard, was that for most of the starting profiles that come with the Kaffelogic studio software, the default “recommended roast level” (and corresponding end time and temperature) is in the medium to medium dark range. The software uses the designated end time to automatically end the roast. One of the great things about the Kaffelogic Studio software is the ability to use the recommended roast level button on the bottom right of the software to quickly and easily make adjustments to the end temperature and time of the roast.
When you name and attempt to save your roast profile, the software will run a diagnostic assessment of your profile and inform you if there are certain recommended changes you should make. The most common recommended change has to do with what Kaffelogic calls “preheat power” in the profile settings. “Preheat power” is a bit of a misnomer as there is no preheating of the roast chamber or the green coffee prior to the actual roasting process. The setting controls the amount of power used by the heating element at the start of the roast. I have found that it is wise to go with the software’s recommendation.
I think most people will find that the Kaffelogic is capable of roasting their desired profile within reasonable tolerances and any minor profile deviation is worth the trade off for the benefits received from the automation.
Batch Sizes
Without a “boost kit,” the recommended batch size is 100-120 grams of green coffee. With the boost kit, the Kaffelogic can roast down to 50 grams and up to 200 grams. The boost kit costs $160 if purchased with the roaster and $180 if purchased as a stand alone product. According to Showroom Coffee’s website, “The BOOST kit includes a lathed anodized aluminum chamber extension with tensioning ‘legs,’ a Studio Software Activation Code (SAC) and a measuring/dosing cup.”
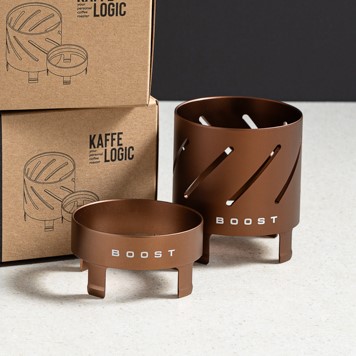
One of the things I found confusing online were the claims that you could not roast down to 50 gram roasts without the boost kit. The reason for the confusion on my part was twofold. First, I equated the extension chamber with the boost kit and had roasted lots of 50 gram roasts without the extension chamber. Second, what I failed to realize and what people failed to articulate online was that it is the Studio Software Activation Code, which is necessary. When you purchase the boost kit, you are provided with a unique code, which unlocks and activates the software’s ability to adjust heat and fan profiles based on the chosen batch size. The test unit I was sent had this activation code already installed and I had assumed this feature was standard. While I am not sure why Kaffelogic has chosen not to make the boost kit standard and just increase the price accordingly, I assume this has something to do with it being an added improvement upon their original design.
My primary focus with the Kaffelogic was roasting 50 gram batches. When roasting 50 grams, the coffee does not touch the thermocouple until well into the roast. Here is it functioning more like an environmental temperature thermocouple. This made me curious if I would even be able to directly scale up 50 gram batches on the Kaffelogic to larger batches on the Kaffelogic where the bean mass covered the thermocouple. To my surprise, I was able to do so with no issue at all and found the coffees to be extremely similar in weight loss, ground color measurements, and indiscernible when it came to flavor. While I have theories, I must admit I don’t understand why this works.
The maximum amount you can roast without the boost kit chamber extension is 120 grams. Depending on the roast level, you may find that you have to be very careful not to spill coffee when you remove the roast chamber.
With the boost kit chamber extension you can roast up to 200 grams. Depending on the roast level, you may find that you have to be very careful not to spill coffee when you remove the roast chamber. If you are roasting darker, the volume may have expanded so much that it spills no matter what you do.
For me, the ability to roast 50 gram batches is one of the most intriguing features of the Kaffelogic when it comes to sample roasting for green coffee buying, roasting for competitions, or profile development. Previously, when I received a 200 grams sample of a green coffee from an importer, I had one chance to roast that on my 3E. With the Kaffelogic, I can roast that coffee four different ways and really get an idea of what range of flavors that coffee has. The same principle holds true when it comes to roasting for a competition or roasting to develop a profile for a coffee.
Scaling Up 50 Gram Profiles
For me, one of my main curiosities about the Kaffelogic was whether I could successfully scale up a profile I developed for 50 grams of coffee on the Kaffelogic to my Coffee Crafters 3E (1 kg) and my Roasted Right (6 kg) roasters. The consensus in online coffee roaster forums seemed to be that this was not possible given the differences in thermocouples, thermocouple placement, and the overall dynamics of going from a small batch roaster to a larger commercial roaster. One added layer of complication to this would be that I could not directly import roast profiles between the Kaffelogic Studio software and Artisan Scope. This meant that I would have to replicate the profiles as closely as I could with the understanding that there would be no way to replicate the profile with 100% accuracy.
I was optimistic as I had already solved a similar challenge when I went from the 3E to the Roasted Right roaster. In my mind, it was just a difference in scale but not a difference in kind. My solution was to tune the BT thermocouple on my Roaster Right roaster so that the coffee hit first crack at the same temp as on the 3E. I found that I could develop a profile on the 3E using 227 grams and could scale that up on the 3E and on the Roasted Right roaster without any change to the profile and repeatedly get roasts that were near identical in weight loss and color measurements and most importantly indistinguishable (at least to me) in blind sensory analysis. This to me proved that the concept was possible. Now, admittedly I ran into a bit of happenstance when it came to the Kaffelogic as it was consistently hitting first crack within 5F of the temperature that first crack occurred on my 3E and Roaster Right Roasters.
The more I thought about things the more it seemed that that the most efficient approach would be to approach this problem from the opposite perspective. Rather than creating a new 50 gram profile for a coffee and scaling that up to my commercial roasters, why not just start with known commercial roasting profiles and known coffees and recreate those profiles in the Kaffelogic Studio software. As orders would come in for my business throughout the week, I would replicate a close approximation to the profile in the studio software, roast the same coffee on the Kaffelogic as I roasted on the 3E or Roasted Right, document the weight loss, take color measurements, and conduct blind tastings. To my surprise what I consistently discovered was that the coffees were coming out with similar weight loss, similar ground color measurements (often only one or two Agtron points different), and most importantly similar flavors in the cup. With lighter roasts, I could not tell the roasts apart in blind triangulation cuppings. That being said, one interesting thing I discovered was that up until around the five minute mark while the coffees were still hot I could consistently identify the odd cup in the triangulation by detecting a very subtle aromatic difference. Once the coffees cooled slightly, these aromatic differences went away and I could not distinguish them. With medium-dark roasts, I often had a slight preference for the coffee roasted on the Kaffelogic as it consistently seemed to be just a little sweeter and smoother. My take away was that even if I found myself wanting to make slight changes to the profile on my commercial roasters, developing 50 gram profiles on the Kaffelogic would allow me to use much less coffee than developing profiles on the 3E and would allow me to develop a profile that would be really close to a final production roast.
My next approach was to use the Kaffelogic to develop new 50 gram profiles for new coffees, which I would recreate in Artisan Scope and roast on my 3E or Roasted Right Roaster. I have only done this with a few coffees but the results mirrored what I had previously experienced. For me, this was confirmation that this could be done.
My theory as to why this worked was that coffee in the Kaffelogic hit first crack around the same temperature as coffee in the 3E and the Roasted Right. In other words, it just happened to be close enough given all the other variables to produce really similar results. I realize that many will not be this fortunate. I would encourage others to try my approach of recreating known commercial profiles for known coffees in the Kaffelogic Studio software, roast 50 gram batches, collect data with whatever tools you access to, conduct blind tastings, and evaluate the similarities and differences. From there, you can make an informed decision about the viability of creating 50 gram Kaffelogic profiles and scaling those up to your commercial roaster. I am confident that with some trial and error those who know their commercial equipment very well can use this approach to make reasonable predictions on how best to scale up 50 gram profiles.
If you are familiar with Artisan Scope, you may know that you can manually increase or decrease the thermocouple reading by going to config > device > symbolic ET/BT and inputing a formula. My first instinct was to see if the Kaffelogic user could make similar changes in the Kaffelogic studio software, but I have not found where that is possible. That being said, Kaffelogic is continuing to improve the Kaffelogic Studio software and maybe this feature is something they can build into the settings.
Airflow
The heart of a fluid bed roasting system is airflow. Airflow is both the mechanism for circulating (i.e., lofting) the coffee in the roasting chamber and the means of heat transfer. In a fluid bed system, inadequate airflow causes two problems. The first problem is that it causes inconsistent circulation of the coffee, which often results in unevenness in the roasted coffee. The second problem is that if the coffee is not constantly moving, the risk of scorching the coffee is high and under the right circumstances the risk of a fire is extremely high. If you are familiar with drum roasting, there are lot of parallels between airflow and drum speed.
The Kaffelogic’s roast chamber design has fins along the bottom of the roast chamber that spins the coffee in a counterclockwise direction similar to Ikawa sample roasters. Kaffelogic and Showroom Coffee recommend a fan setting that is as low as is possible to allow the coffee to slowly turn over and circulate in the roast chamber. They recommend this because they found this to promote better between batch consistency and allowed them to hit their target weight loss for 50 gram batches. They found 50 gram batches to be prone to overdevelopment with higher airflow.
I must admit I was alarmed by how little the coffee circulated in the roast chamber during my initial roasts. It violated everything I know about fluid bed roasting and ultimately was something I changed. The airflow settings worked okay for fast light roasts with an over all roast time of six to seven minutes, but as soon as I started experimenting with more traditional profiles the coffee would completely stop circulating in the roast chamber. This was more common during the drying phase than any other point but I had it occur with larger 200 gram batches near the end of the roast where a fire is extremely likely to occur.
There are two ways to increase the airflow. The first way is to calibrate your fan setting. I recommend doing before you roast your first batch of coffee. Kaffelogic provides clear direction on how to do this. The second way is to increase the airflow via the fan profile curve.
Noise
According to a decibel meter app on my iPhone, the Kaffelogic produces around 70 decibels of noise at the unit. While I did not find the noise uncomfortable even standing next to the roaster, if I were working in close proximity I would wear hearing protection just like I do on my commercial fluid bed roasters. I often found myself starting the roaster and then going and doing other things in the area. Distance certainly softens the noise and I found I could run it while others were sleeping in the home without disturbing anyone.
By way of comparison, my oven/range vent hood produces 64 decibels and a hair dryer produces 75 decibels when measured from the same distance. By way further comparison, my Fresh Roast SR540 produced 78 decibels, my Coffee Crafters 3E and exhaust blower combined produced 83 decibels, and my Roasted Right roaster produced 73 decibels.
Air Quality
I used the Kaffelogic on my kitchen countertop in proximity to my oven exhaust hood. I also ran the exhaust feature on my home’s heat-air exchanger. With both forms of ventilation, I have never set off the smoke detectors, which is something I did with my Fresh Roast SR540 on multiple occasions. This was even with roasting numerous medium-dark roasts. If I were doing numerous back to back roasts, I often would crack a nearby window to allow for some fresh air to enter the room. That being said, the area definitely smelled of roasted coffee while roasting but wasn’t overly strong and quickly dissipated after roasting.
When I roasted with a Fresh Roast SR540, I had to wear a N95 dust mask as a lot of particulates escaped into the air and started to irritate my lungs. I have not had this problem at all with the Kaffelogic. I suspect the explanation for why this is the case probably has to do with a combination of how the Kaffelogic lofts the coffee (less agitation) and improvements in chaff collection (in particular the fine particles).
Expected Longevity
In the Kaffelogic Community online forum, a user asked about the expected longevity of the Kaffelogic. Representatives of the Kaffelogic replied, “The nominal figure is one roast per day for five years which is around 2,000 roasts. However it is intended as an heirloom machine with each part replaceable and therefore an indefinite lifespan. That nominal figure is running time without need to replace a part. Thermocouple and heater element are the two components most likely to need early replacement.”
I reached out to Showroom Coffee with the following three questions. Showroom Coffee reached out to Kaffelogic with my questions. I will just write out my question followed by my summary of their answers.
Q1) What things are serviceable in the field by the user and what requires the roaster to be returned?
A1) Kaffelogic’s preference is for a trained service technician to perform all the service work on the roasters. That being said, the following parts are replaceable and could be replaced by someone in the field: top of the roaster; heating element; motor; main board PCB-A; front board PCB-B; and thermocouple. I am told that with a hex key, some screwdrivers, and a soldering iron a user can do all the repairs necessary.
Q2) What is the expected life span of the major parts: heating element; blower/fan; thermocouple; and electronics?
A2) Kaffelogic reports having testing units in the field with over 2000 motor hours with all original parts still working. During the initial US rollout of the Kaffelogic, two failure points were discovered, repaired by Kaffelogic at not cost to the users, and design changes were made to improve the roaster. The first failure point was the heating element. The second failure point was that the electrical cables that ran from the motor to one of the circuit boards were breaking away from the circuit board due to the torque of the motor.
Q3) Should the Kaffelogic company go out of business, what items related to the Kaffelogic are proprietary and potentially something a person could not replace or find parts for?
A3) Kaffelogic’s response was that they had no intention of going out of business and did not want to speculate on whether the roaster could be repaired if they were out of business. Kaffelogic did not answer the question if any part is proprietary, which suggests to me that the essential components are all commercially available and serviceable if the user has the tools and aptitude.
Interesting Built in Tech
The Kaffelogic has a tremendous amount of technology built into for the price point and they are regularly pushing out firmware updates and software updates to improve the overall product. One of the interesting features is that if the roaster detects that your available line wattage and voltage is lower than what is recommended it will give you a visual warning on the display screen. While you can ignore the warning and press the play button to get it the Kaffelogic to run your desired profile, be prepared for the roaster’s safety features to shut down the roaster in the first thirty seconds. Now, what I have discovered is that nine times out of ten when this happens if you reload your desired profile and restart the roast, it will then go on to roast normally. In fact, I have only had it not allow me to proceed with roasting once or twice in the three months that I have had it. When this has happened, I just have to assume it knows better than I and come back to it later.
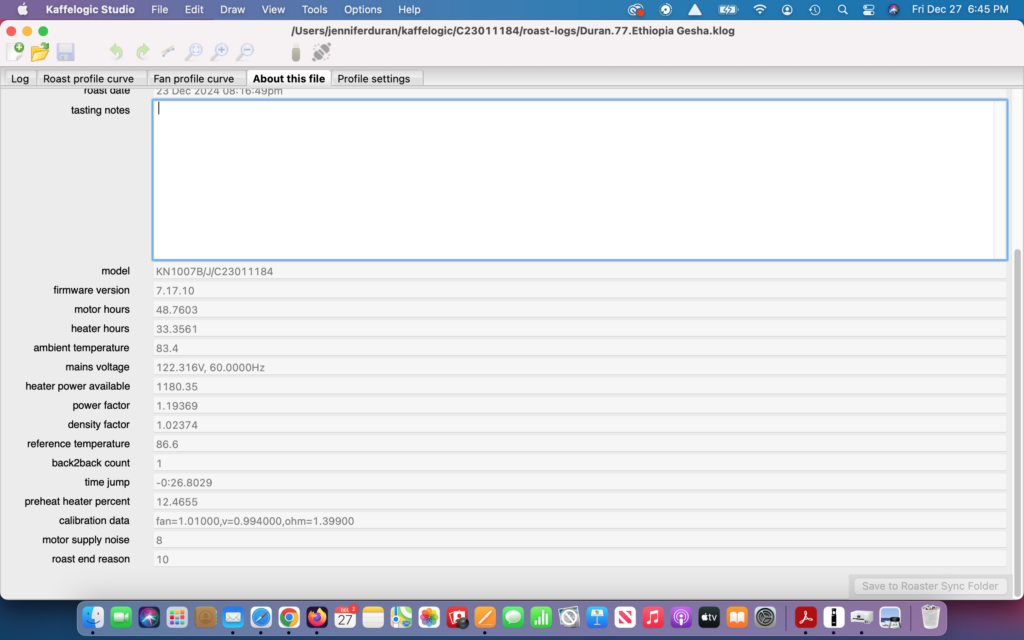
Another interesting feature is the information that is available post roast in the roast log file under the tab “About this file.” Here not only can you find your line voltage and wattage that was available during the roast, you can also individually see how many hours your motor and your heating elements have on them. Over time, Kaffelogic will eventually have a sense of what the predictable life span is for the various critical components. Having access to how many hours these critical components have on them allows the user to make informed maintenance decisions prior to these parts reaching their expected life span.
Quirks
Stalled bean movement: I have already touched on this above. Even with recalibrating the fan and setting the fan speed higher in the fan profile, there are still times that I get stalled bean movement during the drying phase. It doesn’t happen often but it does happen. When it does, I often find rocking the roaster side to side provides enough assistance to get the coffee moving. Now, it should be said that one option I do have is to recalibrate the fan so that it has more bean movement. This would likely solve the issue. At a future time, I will experiment with different fan calibration settings with the same coffee and same roast profile to see what impact that has on the roasted coffee.
Dumping the roasted coffee: There is no question that it is a little awkward to dump coffee out of the roaster and that the larger the batch the more awkward it is to prevent spilling the coffee. To dump the coffee, you have to remove the upper roast chamber and tilt the base unit essentially upside down and shake it to fully empty the roaster chamber as coffee is prone to get stuck in the fins of the roasting chamber. Thankfully, no part of the roaster is too hot to touch after the cooling cycle. The hottest component is the upper roaster chamber and even it is not uncomfortable to touch even during roasting. For the price point, this seems a reasonable compromise and keeps the overall design more mechanically simple than something like the Ikawa.
Visibility of the coffee: It is very difficult to see the coffee in the roast chamber even with an external light.
Power cord length: The power cord is around 43 inches long. This is fairly common for roasters such as this but it really limits where the roaster can be used. The Kaffelogic is like other small sample roasters in that recommend against using extension cords.
Upper roast chamber: The one word of caution about the upper roaster chamber is that it lacks a rigid twist connection. It just rests on top of the roaster and can be knocked off with less force that one might expect. If you move the roaster between roasting sessions, it is recommended to remove the upper roasting chamber prior to moving to avoid it falling off and getting damaged.
Would I recommend the Kaffelogic?
Given my experience with the Kaffelogic over several months and conducting around 75 roasts, the short answer is, “Yes.” If you are someone who values function over form, PID roaster automation, and high perceived value for money spent, I am not aware of another 50-200 gram sample roaster on the market with as many features for the price point.
Would I recommend this as a first roaster? No, I always recommend people start off with manual roasters like a stove-top popcorn popper or the Hive roaster that allow you to learn the sensory side of roasting coffee at a much cheaper price point. Many decide coffee roasting is not for them. Now, it is fair question whether they would have continued roasting coffee if they were able to more easily get better results with a roaster like the Kaffelogic.
I would recommend the Kaffelogic for hobby roasters who want to take their craft to the next level. In my opinion, the ability to precisely roast 50 gram batches is a game changer. This makes roast profile exploration very economical and allows you the opportunity to really start making correlations between changes in roast profile and predictive flavors in the cup. Another really interesting feature is the ability to share profiles among Kaffelogic users and work in a collaborative manner to build your skills.
Given my experiences up to this point and my conversations with other users, I would recommend the Kaffelogic for professional roasters, especially other fluid bed roasters, who are looking for a economical tool for sample roasting new green coffees and profile development. I must admit that when I agreed to take on this project I explained to Showroom Coffee that I was not in the market for a sample roaster and I had no intention of purchasing one. My thought process was that I already had the 3E that allowed me to roast 200 gram green coffee samples and to develop roast profiles using 227 grams of coffee. At the time, I could not appreciate the value of being able to roast 50 gram batches.
Even though the difference between 50 grams and 227 grams is minimal from one perspective, it wasn’t until I had the ability to roast 50 grams in a controlled, reliable, and repeatable method that I appreciated the difference. Rather than having only one attempt to sample roast a new green coffee sample from an importer with my 3E, I now have the opportunity to roast the coffee four different ways if I so desired. The same principle held true with experimenting with roast profiles. I found myself much more willing to experiment with 50 gram roast profiles than I would 227 gram profiles. This ultimately made dialing in a roast profile for a new coffee much more efficient. The fact that the Kaffelogic uses really well designed PID software meant that I also did not have to hover around the roaster and was free to multi-task in the area.
What about the Kaffelogic’s more expensive sibling roaster, the Nucleus Link? The Nucleus Link comes in at around $1950 compared to the Kaffelogic at around $1300. I will say that before I had hands on experience with Kaffelogic I had made up my mind that if I were to purchase one of the two roasters it was going to be the Nucleus Link. I have now changed my mind. The Nucleus Link is functionally the same roaster built in the same factory with the same critical components. The Nucleus Link comes with a travel case, an ever increasing number of stock roast profiles (their website says over 700), a similar online user group like Kaffelogic Community, and a mobile app that is designed to help users select roast profiles based on coffee density and processing method. The other feature of the Link is the ability to easily travel with the Link and calibrate the fan to your altitude by entering some information into the app and using the recommended fan setting. The primary appeal of the Nucleus Link is that it makes roasting good coffee more simple than with the Kaffelogic. Once you enter the information about the coffee into the Link app, it recommends a few profiles for you to start with that are all likely to result in a good cup of coffee. Essentially you are paying an additional $600 for this convenience and their expertise in profile recommendations.
The interesting thing is that there is nothing the Nucleus Link can do that cannot be replicated on the Kaffelogic. It is also worth noting that profiles can be shared between users of both roasters simply by changing the ending of the file names. Link profiles end in “.npro” and Kaffelogic profiles end in “.kpro”. All the user has to do is change the file name from “roastprofilexxx.npro” to “roastprofilexxx.kpro” and vice versa. One could imagine that with a little bit of collaboration between the two communities, there could quickly be a lot of information shared that would essentially replicate the role of the Link app.
If you are in the market for a sample roaster, I think the Kaffelogic Nano 7 ought to be on your short list for consideration. If you have any questions, feel free to send me an email at info@ketchcoffee.com.
